TABLE OF CONTENTS
- Introduction
- Components of a Survey
- Example: Building a User Migrations Survey
- Testing the Survey
- Further Support
Introduction
Surveys provide a flexible way for end-users to interact with data in ManagementStudio using only a web browser. For example, end-users would validate the information that's held about them, or an application owner might update procurement and allocation details.

Examples of a survey
To help simplify the layout and only display fields when necessary, checkboxes and radio buttons can be used to control which sections are displayed based on a user response. In the example below, selecting the checkbox displays additional text and data fields if the user requests a remote install.
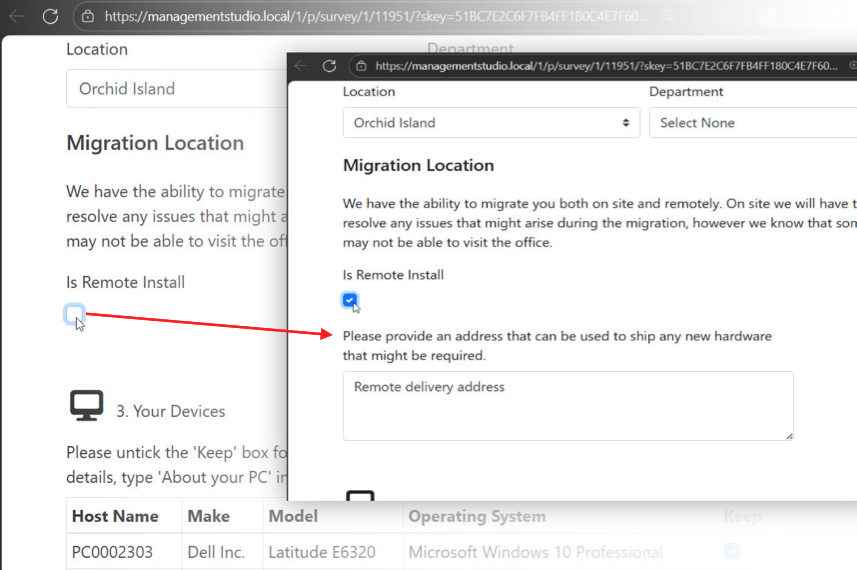
Using a checkbox as a conditional control
By only displaying the information that's pertinent, the quality of the data returned improves, survey fatigue is reduced, and participation rates increase.
This document will discuss the components required to create a survey in ManagementStudio, and provide several examples of how to configure the show/hide control for radio buttons and checkboxes.
Components of a Survey
In ManagementStudio, a survey consists of two components:
- A Portal Form that controls the presentation layer (the look and feel of the survey, the fields that are displayed),
- A Custom Form to store the survey results in ManagementStudio.
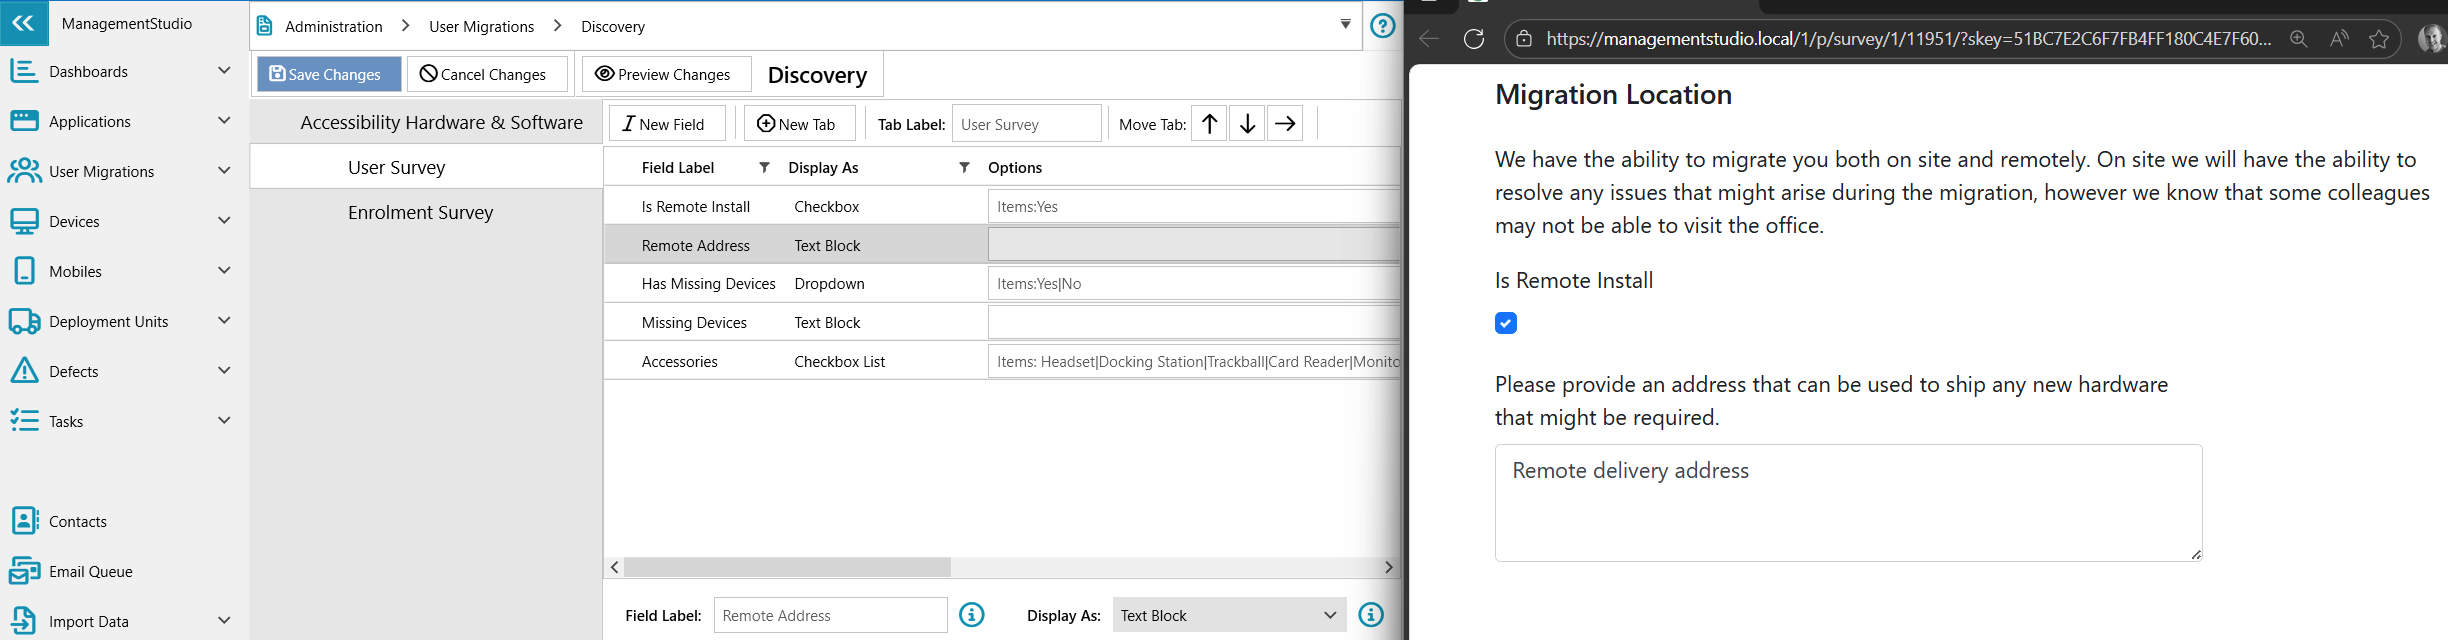
Left: The Custom Form configuration; Right: The Portal Form presentation layer.
Custom Forms are a simple way to extend the data fields in ManagementStudio and are created in the Discovery tab, Custom Tab 1, Custom Tab 2, and the Hidden Tab for a specific module. The table below illustrates the support for each Custom Form type across the primary and secondary modules:
| Module | Discovery | Custom Tab 1 | Custom Tab 2 | Hidden Tab |
|---|---|---|---|---|
| Applications | ✓ | ✓ | ✓ | ✓ |
| User Migrations | ✓ | ✓ | ✓ | ✓ |
| Devices | ✓ | ✓ | ✓ | ✓ |
| Bespoke | ✓ | ✓ | ✓ | ✓ |
| Deployment Units | ✓ | ✓ | ✓ | ✓ |
| Defects | ✓ | ✓ | ✓ | ✓ |
| Tasks | ✓ | ✗ | ✗ | ✗ |
| Contacts | ✗ | ✗ | ✗ | ✗ |
Support for Custom Forms
Example: Building a User Migrations Survey
This example will walk the reader through the process of adding an interactive checkbox and multi-option radio buttons to a survey:

Although this example uses the Discovery tab in the User Migrations module, the concepts are transferrable to all modules that support Custom Forms (see table in the previous section).
Create a Custom Form
- Switch to Administration, select the module and choose the target Custom Form. This example will use:
- Administration > User Migrations > Discovery
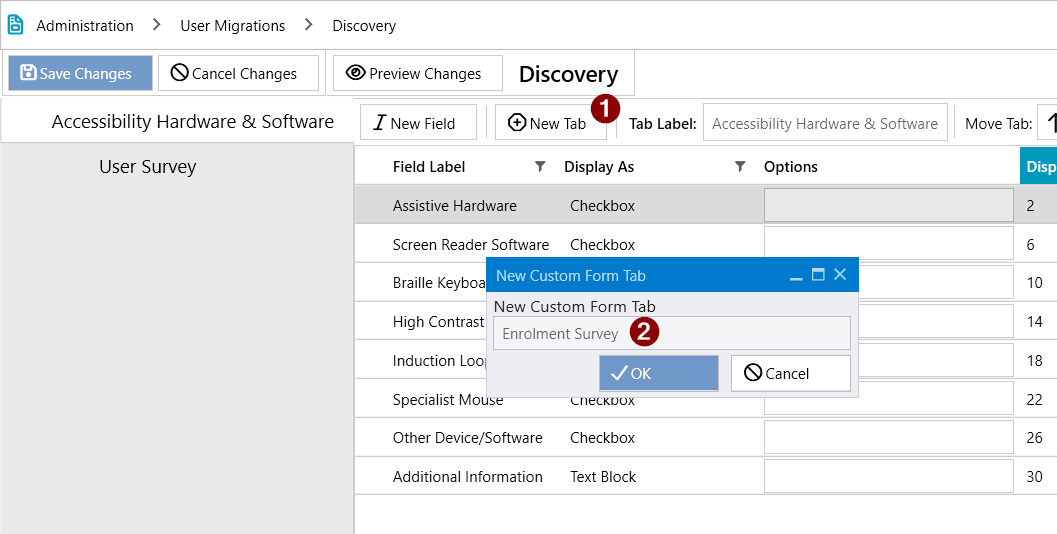
- Click New Tab (#1 in the image below)
- Specify a name for the form (#2 below) and click OK. In the example below, the new form is called Enrolment Survey.
- Ensure that the newly created tab is selected (#1 below)
- Use the New Field (#2) button to create five new fields with the following properties:
| Field Label | Display As | Options |
|---|---|---|
| Interactive Checkbox | Checkbox | |
| Interactive Radio Buttons | Radio Buttons | Items:Yes|No |
| Text Field 1 | Text Line | |
| Text Field 2 | Text Line | |
| Text Field 3 | Text Line |
- Click Save Changes (#3)
![]()
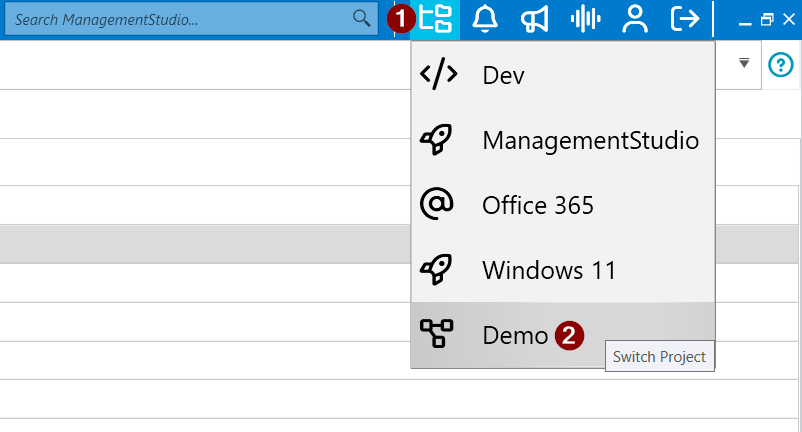
- New Portal Forms are refreshed when the client is first launched. To reload the project, select the Project Switcher icon (#1) and choose the project that is in use (#2). The default project is called ManagementStudio.
Create the Portal Form
With the backend Custom Form created, the next step is to create the Portal Form (the presentation layer) and link the two components.
- Navigate to Administration and select Portal Settings towards the bottom
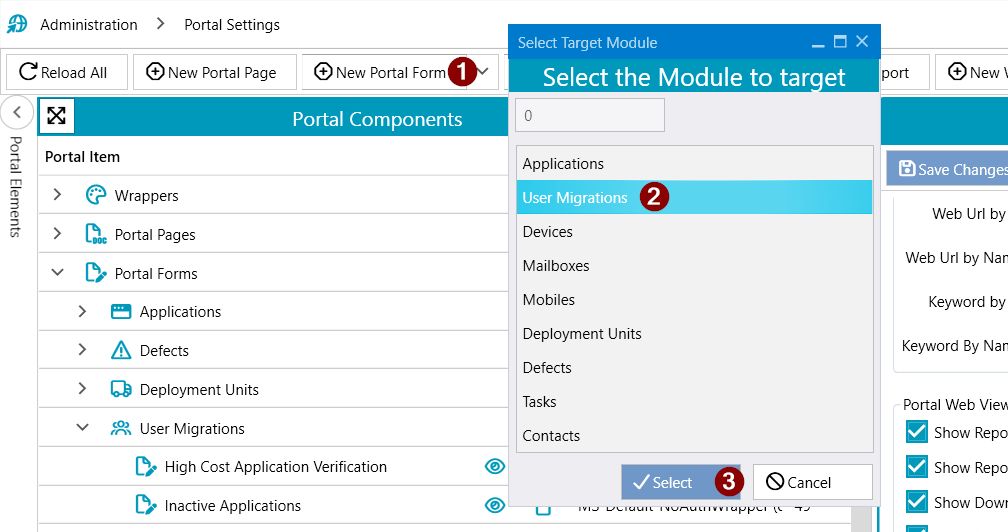
- Click New Portal Form (#1)
- Select the target module - User Migrations (#2), in this example - and click Select (#3)
- The Portal Form configuration screen will open the new form.
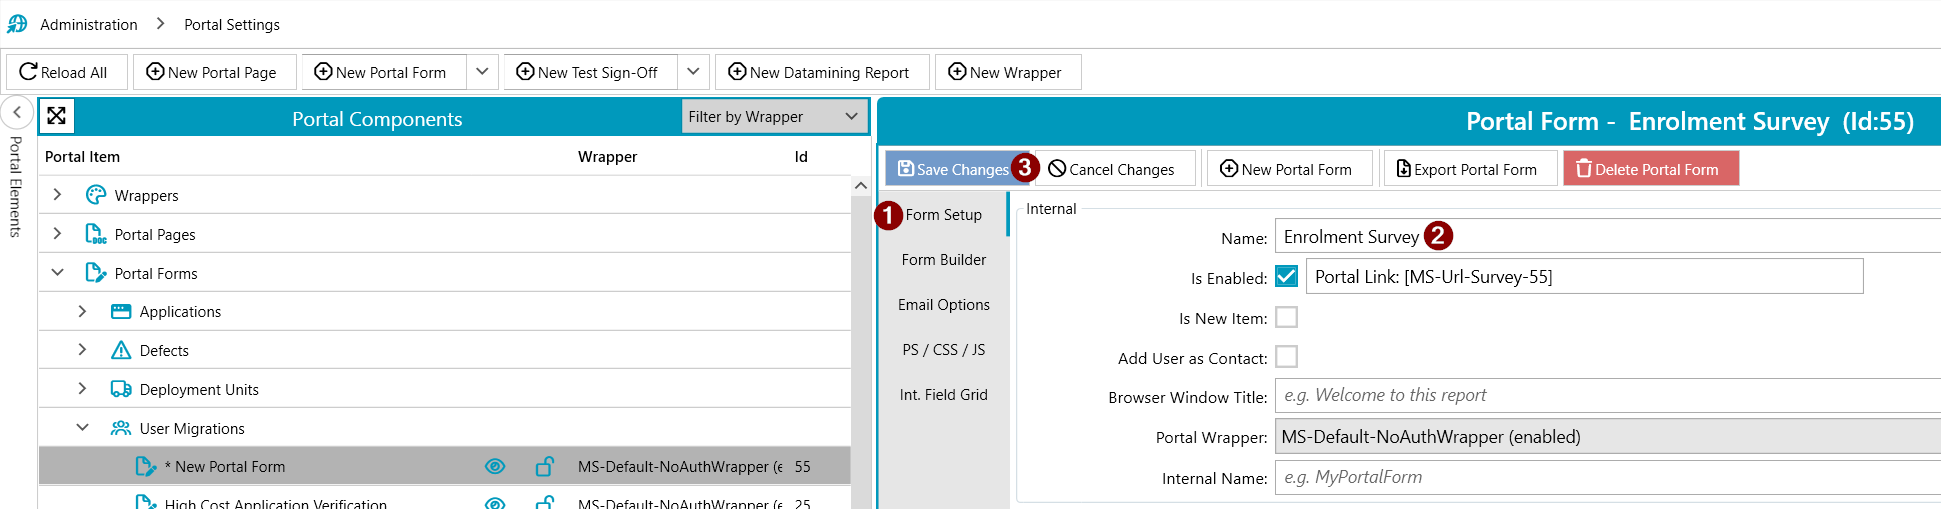
- Ensure that the Form Setup tab (#1) is selected and enter a Name (#2) for the form. This example uses Enrolment Survey.
- Update the other fields, such as Portal Wrapper, and click Save Changes (#3). For further information on the remaining form options, please refer to the Portal Forms (Surveys) - Form Setup knowledge base article.
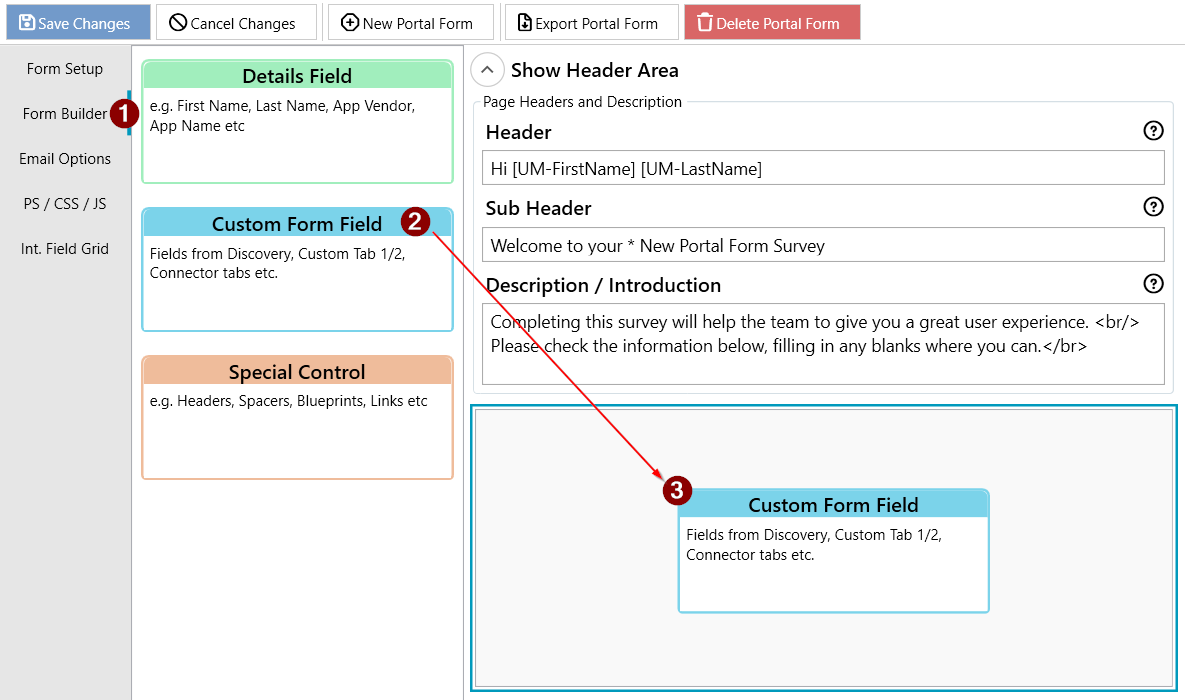
- To add fields to the survey, select Form Builder (#1) from the vertical menu to open the form designer.
- Enter a Header, Sub Header, and Description / Introduction. This text will appear at the top of the survey.
- Click and drag the Custom Form Field card (#2) to the design canvas (#3) and release the mouse.
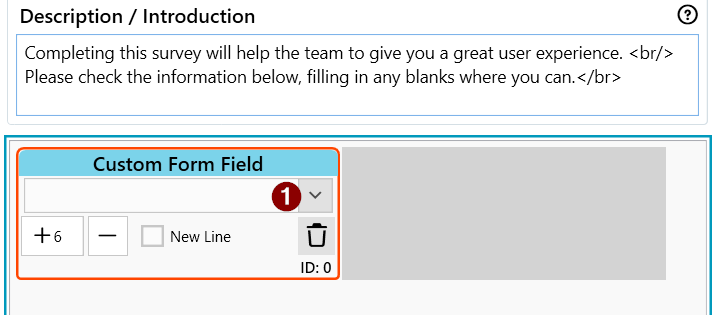
- To link this Custom Form Field to checkbox field created earlier, click the drop down (#1) and choose Discovery\Enrolment Survey\Interactive Checkbox [Checkbox] from the list.
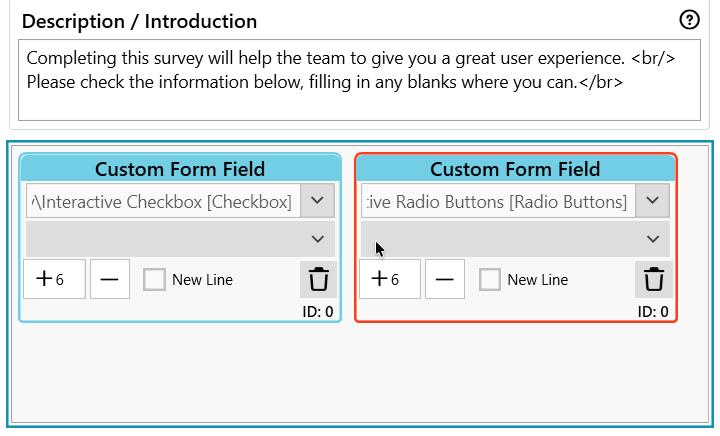
- To add the radio buttons, click and drag the Custom Form Field card (#1) to the right of the design canvas and release the mouse (#2).
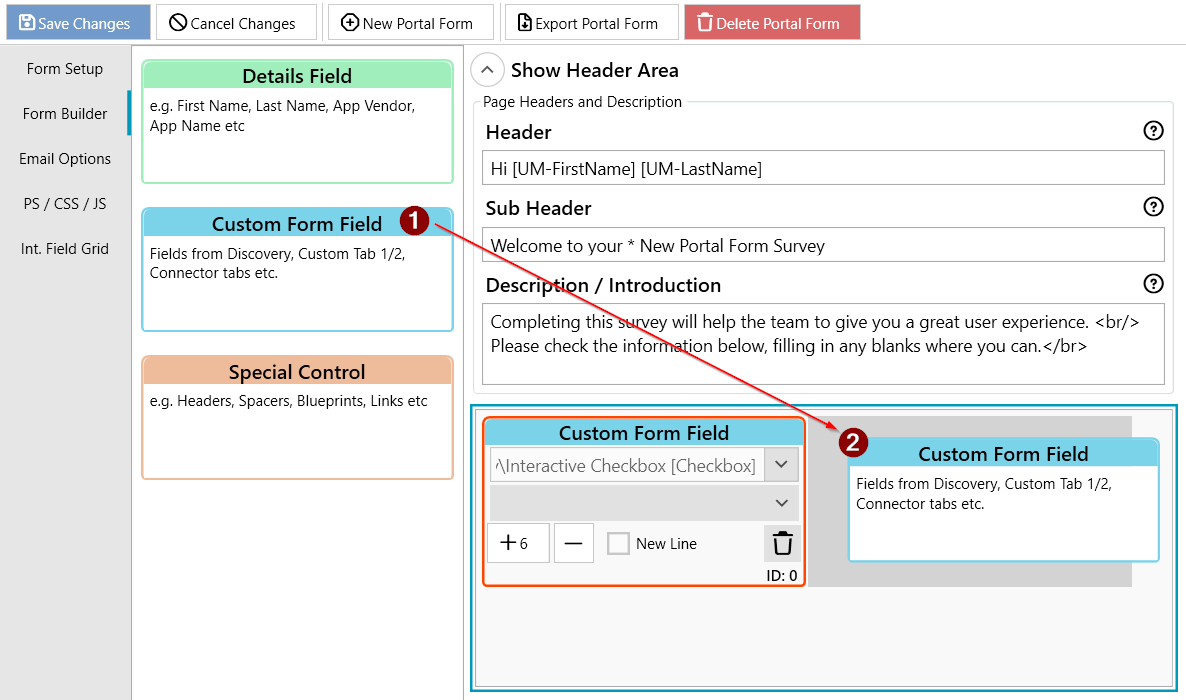
- As per the previous step, click the dropdown menu in the new car and select Discovery\Enrolment Survey\Interactive Radio Buttons [Radio Buttons] from the list of options.
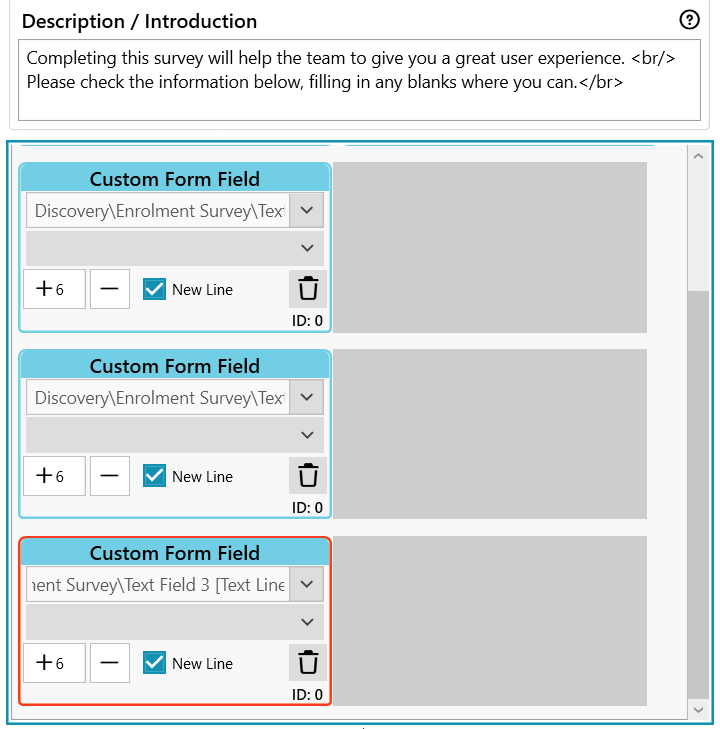
- Add another three Custom Form Field cards to the design canvas, and choose the following options from the drop down:
| Field | Options |
|---|---|
| Discovery\Enrolment Survey\Text Field 1 [Text Line] | New Line |
| Discovery\Enrolment Survey\Text Field 2 [Text Line] | New Line |
| Discovery\Enrolment Survey\Text Field 3 [Text Line] | New Line |
- The design canvas should look similar to the screenshot below.
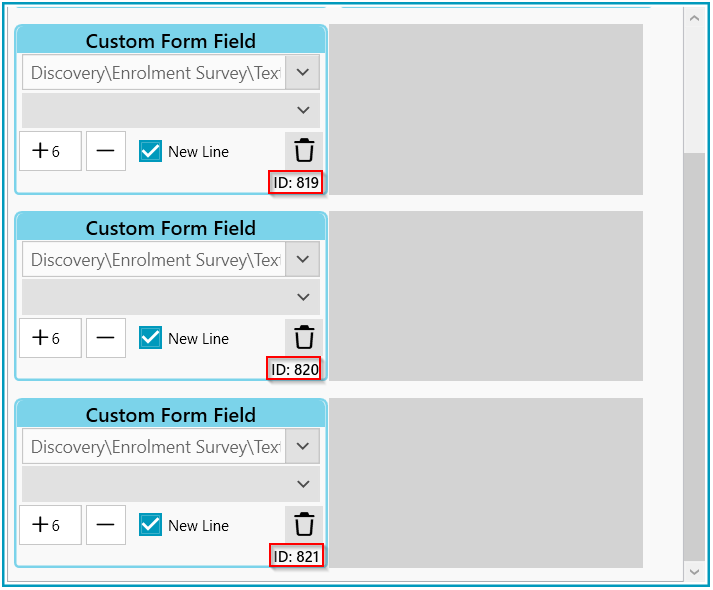
- Click the Save Changes button at the top of the form configuration screen and make a note of the IDs assigned to the three text fields added in the previous step. In this example, the IDs are:
- Text Field 1: 819
- Text Field 2: 820
- Text Field 3: 821
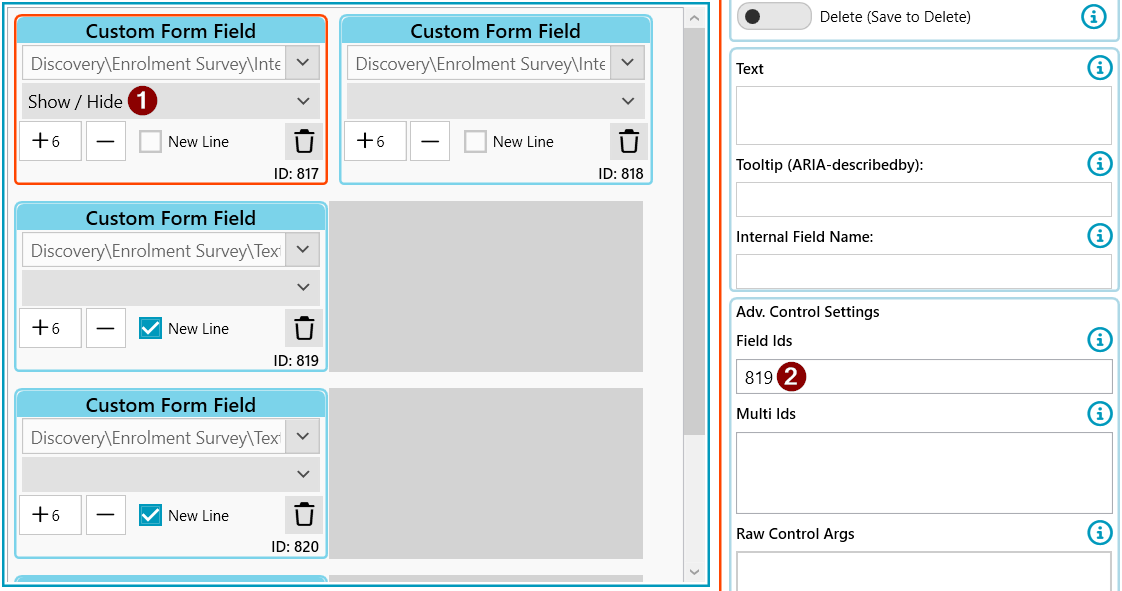
- Scroll to the top of the design canvas and locate the Custom Form Field that is linked to the checkbox. This is most likely the field with the lowest ID as it was added first.
- Click the second drop down menu on the Custom Form Field card and choose Show / Hide (#1).
- Next, using the IDs noted earlier, add the first text field ID (819 in this example) to the Field Ids section in the Adv. Control Settings on the right (#2)
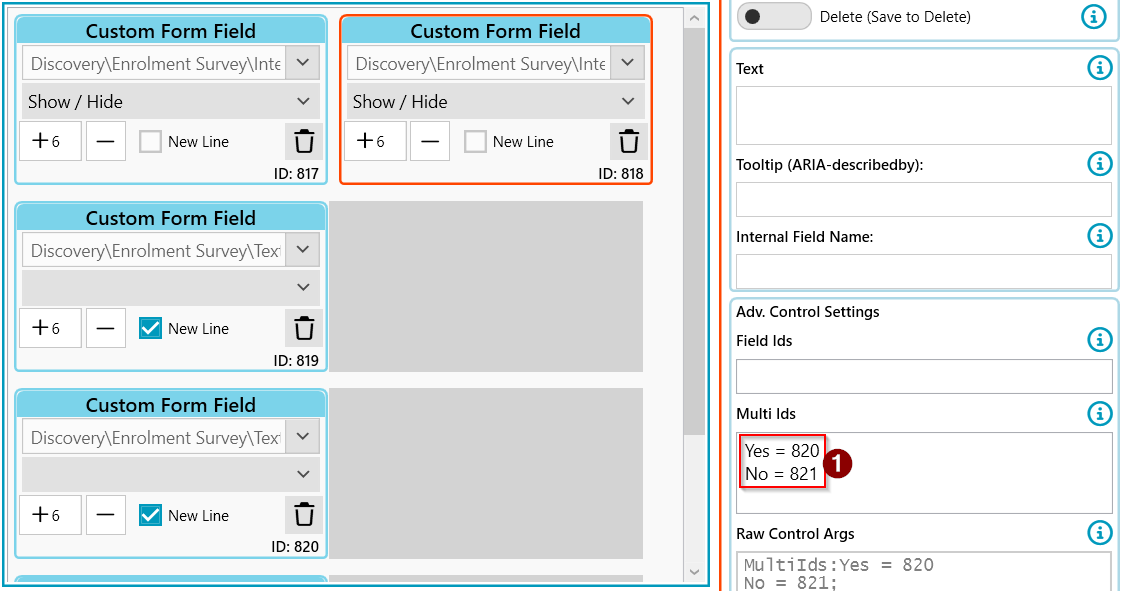
- Repeat this for the Custom Form Field card that was added for the radio buttons, except add the remaining two text field IDs to the Multi Ids field on the right (#1). The radio button has two options in this example - Yes and No - so assign a field ID to each option:
- Yes = 820
- No = 821
- Update the field IDs for your instance. Multiple field IDs are supported, for example, Yes = 1001, 1002, 1003.
- Click Save Changes at the top.
Testing the Survey
- Switch to the User Migrations module, select All User Migrations and double click any user record.
- Select Surveys (#1) from the tabs across the top and choose the Enrolment Survey (#2) from the vertical list.
- Click on the Survey link.

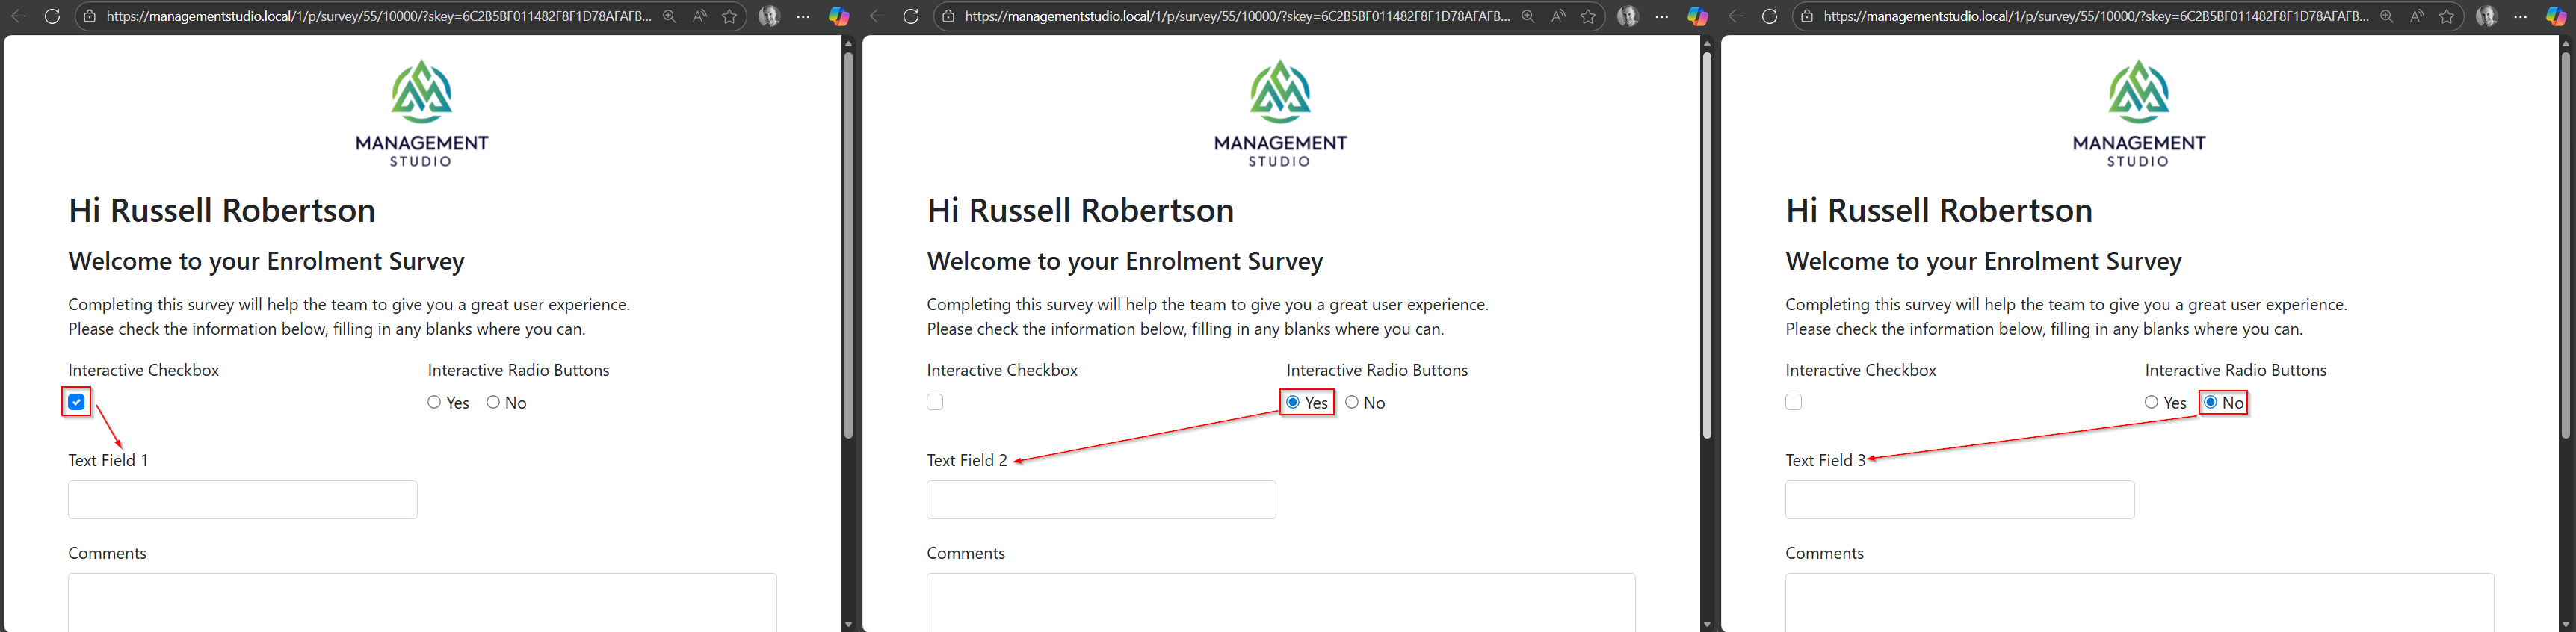
- The survey will open in a web browser. Click on the checkbox and radio buttons to test the interactive show/hide on the page.
- Selecting the Interactive Checkbox option will display Text Field 1.
- Selecting Yes from the Interactive Radio Buttons will display Text Field 2.
- Selecting No from the Interactive Radio Buttons will display Text Field 3.
Further Support
If you require further support, please visit ManagementStudio's Service Desk to search the knowledge base or create a new support ticket.
Was this article helpful?
That’s Great!
Thank you for your feedback
Sorry! We couldn't be helpful
Thank you for your feedback
Feedback sent
We appreciate your effort and will try to fix the article